Tag Archives: baking

Real men eat quiche (when I make it)

19 Jun

So. Yesterday morning I decided quiche and salad would make the perfect lunch.  I’d intended to have boiled new potatoes too, but completely forgot them at the last minute.  Ah well.

The quiche was going to be one of those fridge leftover scooper uppers, taking in full fat milk; some rashers of bacon, a red onion, frozen broad beans, and a chunk of Coolea cheese left over from G’s birthday.  Oh, and lots and lots of eggs.  And some parsley picked from the doorstep.
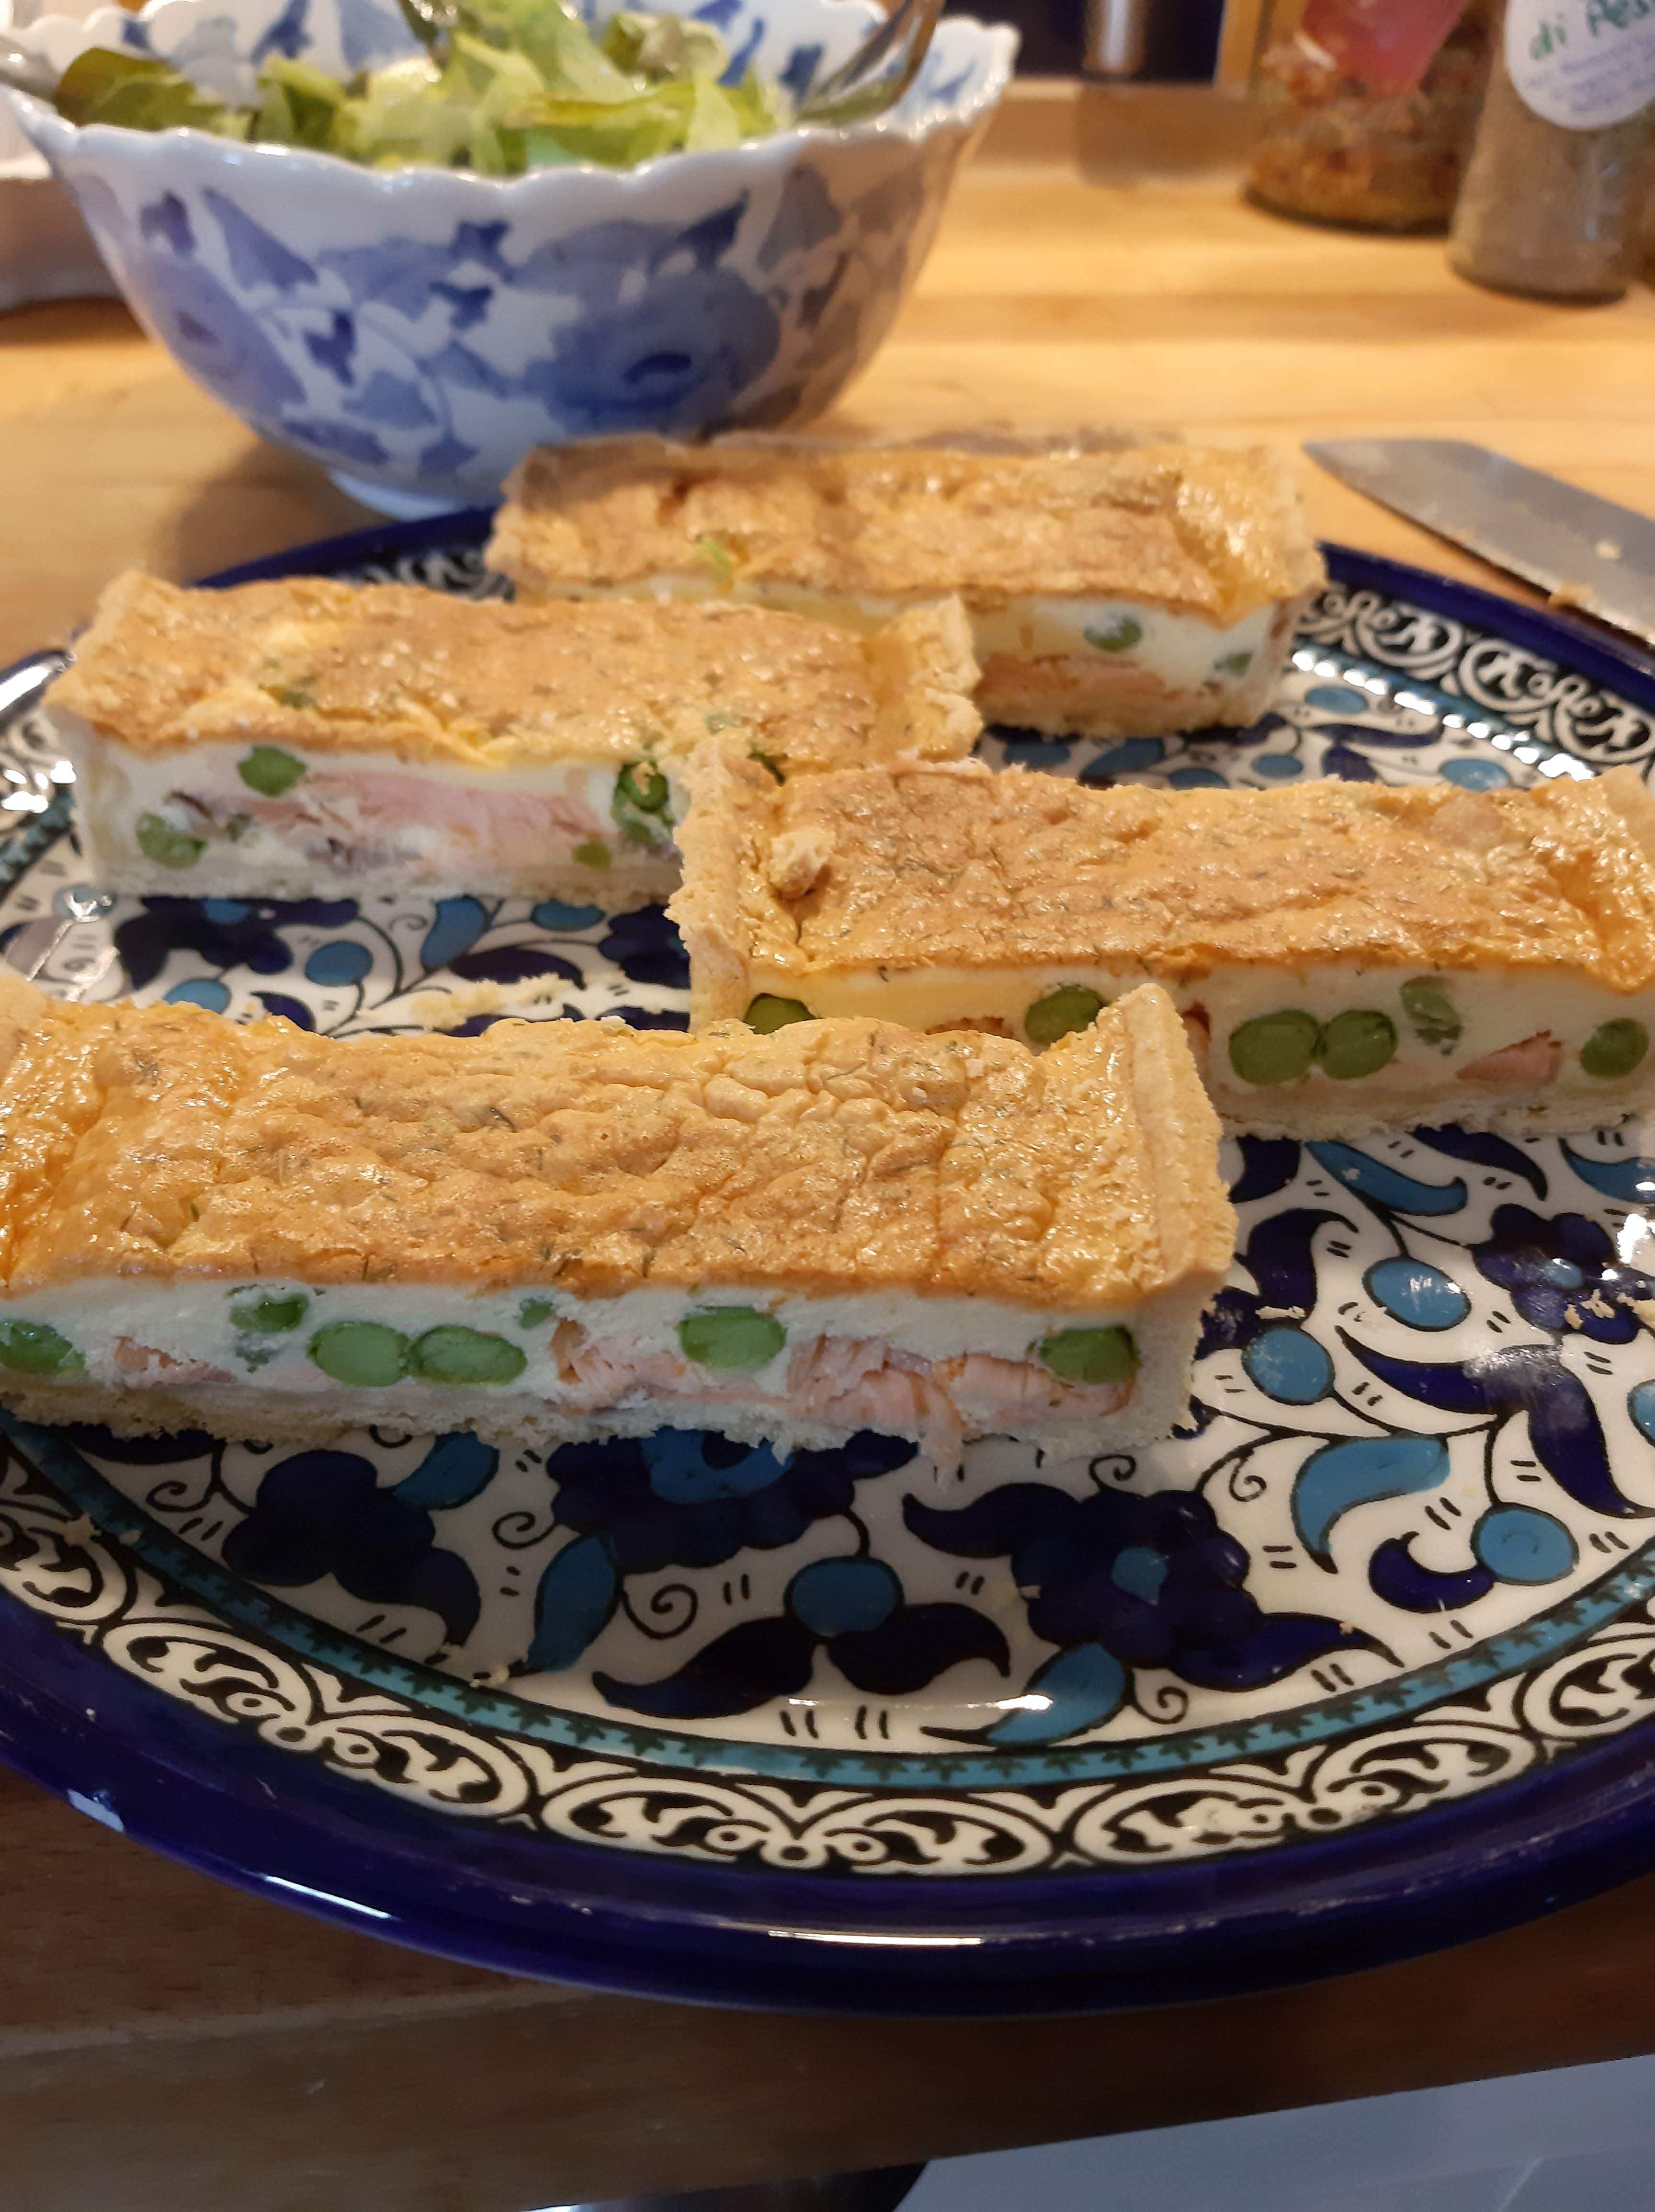
Spring quiche

Shortcrust pastry

8oz plain flour

2oz butter, cold from the fridge

2oz lard (cookeen), also cold from the fridge

Some grated parmesan

Salt and pepper, and some harissa style spice mix

  1. Sift the flour into a large bowl
  2. Chop the butter and lard in chunks into the flour
  3. Using your fingertips, rub everything together, lifting it high over the bowl as you go to incorporate air into the mix
  4. When it resembles breadcrumbs (ish) add the seasoning and flavourings if you want them – here I used some leftover parmesan in the fridge and some spicy herb mix
  5. Using a knife mix in enough cold water to form a stiff dough
  6. Squash down a bit (so it’s easier to roll out later) and wrap in clingfilm and leave in the fridge for at least 30 mins.
Quiche filling
3 rashers bacon
1 red onion
knob of butter
a bowl of frozen broad beans
a few spears of asparagus
5 eggs
about 1/2 cup milk
While the pastry is chilling in the fridge grease a tart tin (I used a loose bottomed non-stick tin which must be about 12″ across) and then start preparing the filling ingredients.
  1. Snip the bacon rashers with a pair of scissors into a frying pan (you could of course use a sharp knife, but I find it much easier to use scissors)
  2. Finely chop the red onion and add to the pan with the bacon
  3. Add a knob of butter and cook gently over a medium heat
  4. Meanwhile, if your broad beans need to be peeled again (the grey skin isn’t the nicest flavour, and it doesn’t look too good) then quickly boil them up in a pan with a little water. Boil for a couple of minutes, then rinse in cold water. They are easy to peel – nick the grey skin with your finger nails, then squeeze the bright green beans out of the grey pocket. Yum.  You’ll be surprised how small a bowl you need for the actual beans!
  5. Break the asparagus into roughly inch long sections.  Start by holding the asparagus at both ends and bend it till it breaks.  The end you are holding with the tip is the good stuff.  The other end may be too woody and can be thrown away.  To be honest, in this recipe I ended up using a bit of the woody end too.
  6. By now you can probably take the pastry out of the fridge, roll it out to about 3-4mm and line your well greased tart tin.   Or lots of wee ones if you are making individual quiches.
  7. Prick the base with a fork, leave the pastry draped over the edges while you bake it.  If you don’t the pastry is likely to shrink from the edges and it will be neater if you cook it like this and then cut off the draped edges later.
  8. Roughly cut a piece of greaseproof paper so it is slightly bigger than the tart. Lay this on top of the pastry and cover with baking beans, or ordinary dry beans or rice.
  9. Cook in a hot oven for about 10-15 mins, then remove the paper and the baking beans and cook for a further 3-4 minutes
  10. While it’s in the oven you can crack your eggs into a big bowl and start whisking them – I just use a hand whisk.  Add some milk, or cream if you have any. Or creme fraiche.  You could also add mascarpone cheese or other cream cheese if you have some.
  11. Season with freshly ground black pepper.
  12. Now, neaten the edges of the pastry case, and then start adding the filing.
  13. First, make a layer of bacon and onion.  Then add the broad beans and the then the asparagus.  Grate over some cheese and if you have any herbs add them – I’ve got a couple of pots of parsley by the front door and snipped off a good handful and sprinkled this over the other filling.
  14. You might want to put the tart tin onto another baking tray at this stage, just in case of leakage.
  15. Finally, pour in the eggy mixture and put straight into a hot oven.
  16. It’ll be ready in oh, about 20 – 30 minutes.
You may notice I haven’t got very precise weights, or timings.  I remember when I was still at school and my elder brother had phoned from his university digs to ask mum how long to boil tatties.  She had said ’till they are done’ which has always stuck me as the most sensible answer.
To be fair to my mother, we had an oil-fired rayburn which was on constantly and this forgiving way of cooking meant you never had to focus so carefully on timings.
This quiche is probably enough to feed 8 if you have various other salads and so on with it, if you only have a green salad, then it might only be enough for 6.  Of course, we shared it between two of us, but over several meals.
I think it tastes best still warm rather than hot hot from the oven, or cold from the fridge.

Daring kitchen challenge

29 Mar

Do you know the Daring Kitchen website?  If you like a challenge, and you love cooking, then this is the site for you.  Go google it. (i’d put in a linky thing, but I seem to have lost the ability to do that).

Anyway, the March 2011 Daring Baker’s Challenge was hosted by Ria of Ria’s Collection and Jamie of Life’s a Feast. Ria and Jamie challenged The Daring Bakers to bake a yeasted Meringue Coffee Cake.

It was awesome.  It was something I would NEVER have attempted, but in reality it was actually pretty straightforward to make. So, thank you Daring Kitchen for encouraging me to make this scrumptious cakey thing.

My instruction was to make two cakes, but I just made the one.  This is the recipe for making the one cake, approx 10” in diameter.   I have included the alternative filling ingredients at the end… and I think I might try this alternative version in the next couple of weeks.  After I’ve moved flat.


The Daring Baker's finished product


FILLED MERINGUE COFFEE CAKE

Not sure why it’s called a coffee cake, there is no coffee in it. Perhaps it’s a technical term for a cake made with yeast?  Any thoughts anyone?

Ingredients

For the yeast cake dough:

2 cups (300 g / 12oz) flour
1/8 cup (25 g / 1 oz.) sugar
½ teaspoon salt
½  sachet (1 tsp) active dried yeast
3/8 cup (90 ml / 3 fl. oz.) whole milk
1/8 cup (30 ml / 1 fl. oz. water (doesn’t matter what temperature)
¼ cup (65 g / 2.5oz.) unsalted butter at room temperature
1 large egg at room temperature

For the meringue:

2 egg whites at room temperature
pinch of salt
½ teaspoon vanilla
¼ cup (55 g / 2 oz.) sugar

For the filling:

½ cup (55 g / 2 oz.) chopped pecans or walnuts
1 Tbsp (15 g / ½ oz.) granulated sugar
¼ teaspoon ground cinnamon
½ cup (85 g / 3 oz.) dark chocolate, chopped roughly

Egg wash: 1 beaten egg
Cocoa powder (optional) and confectioner’s sugar (powdered/icing sugar) for dusting cakes

Directions:

Prepare the dough:

  • In a large mixing bowl, combine 1 1/3 cups of the flour with the sugar, salt and yeast.
  • In a saucepan, combine the milk, water and butter and heat over medium heat until warm and the butter is just melted. Ria’s version: add the 10 saffron threads to the warmed liquid and allow to steep off of the heat for 10 minutes. This will give the mixture a distinct aroma and flavor and a yellowish-orange hue.
  • With an electric mixer on low speed, gradually add the warm liquid to the flour/yeast mixture, beating until well blended. Increase mixer speed to medium and beat 2 minutes. Add the eggs and ½ cup flour and beat for 2 more minutes.
  • Using a wooden spoon, stir in enough of the remaining flour to make a dough that holds together. Turn out onto a floured surface (use any of the remaining flour) and knead the dough for 8 to 10 minutes until the dough is soft, smooth, sexy and elastic, keeping the work surface floured, adding extra flour as needed.
  • Place the dough in a lightly oiled bowl. Cover the bowl with plastic wrap and a kitchen towel and let rise in a warm place until double in bulk (probably about 45 – 60 minutes). The rising time will depend on the type of yeast used and the temperature of the room


Beating the dough

The lovely smooth, silky dough, before it's started rising

Prepare your filling:

  • In a small bowl, combine the cinnamon and sugar for the filling. Chop your chocolate and nuts, and keep them in separate bowls.

Once the dough has doubled, make the meringue:

  • Beat the egg whites with the salt, first on low speed for 30 seconds, then increase to high and continue beating until foamy and opaque.
  • Add the vanilla then start adding the sugar, a tablespoon at a time as you beat, until very stiff, glossy peaks form.

Assemble the Coffee Cakes:

  • Line a baking sheet with parchment paper.
  • Punch down the dough and divide in half. On a lightly floured surface, roll out the dough into a 20 x 10-inch (about 51 x 25 ½ cm) rectangle.
  • Spread the meringue evenly over the rectangle up to about 1/2-inch (3/4 cm) from the edges.
  • Sprinkle the filling evenly over the meringue.
  • Now, roll up the dough jellyroll style, from the long side. Pinch the seam closed to seal.
  • Very carefully transfer the filled log to one of the lined cookie sheets, seam side down. Bring the ends of the log around and seal the ends together, forming a ring, tucking one end into the other and pinching to seal.
  • Using kitchen scissors or a sharp knife (although scissors are easier), make cuts along the outside edge at 1-inch (2 ½ cm) intervals. Make them as shallow or as deep as desired but don’t be afraid to cut deep into the ring.
  • Cover the cakes with plastic wrap and allow them to rise again for 45 to 60 minutes.
  • Preheat the oven to 350°F (180°C).
  • Brush the top of the cake with the egg wash.
  • Bake in the preheated oven for 25 to 30 minutes until risen and golden brown. The dough should sound hollow when tapped.
  • Remove from the oven and slide the parchment paper off the baking sheet onto the table. Very gently loosen the cake from the paper with a large spatula and carefully slide the cake onto a cooling rack.
  • Allow to cool.
  • Just before serving, dust the top of the cake with icing sugar and cocoa powder if using chocolate in the filling. I forgot to do this and it didn’t seem to mar the enjoyment of the cake.

These cakes are best eaten fresh, the same day or the next day, although I quite liked it as it got slightly chewier after a day or two.  But ok, best on the day it’s made.  Warm with ice cream.  Oh yes!

For the other version you will need 10 strands saffron for the dough.  (Saffron might be hard to find and it’s expensive, so you can substitute with ½ – 1 teaspoon of ground cardamom or ground nutmeg.)

Ria’s version filling:
1 cup (130 g / 5 oz.) chopped cashew nuts
2 Tablespoons (30 g / 1 oz.) granulated sugar
½ teaspoon garam masala (You can make it at home – recipe below – or buy from any Asian/Indian grocery store)
1 cup (170g / 6 oz.) semisweet chocolate chips ( I used Ghirardelli)


**Garam (means “hot”) masala (means “mixture”) is a blend of ground spices and is used in most Indian savory dishes. It is used in limited quantities while cooking vegetables, meats & eggs. There is no “one” recipe for it as every household has a recipe of their own. Below, I am going to share the recipe which I follow.

4 or 5 sticks (25 g) Cinnamon Sticks (break a stick and open the scroll)
3 ½ tablespoons (25 g / less than an ounce) Cloves, whole
100 g. (3.5 oz.) Fennel seeds
4 tablespoons (25 g / less than an ounce) Cumin seeds
1 ½ tablespoons (10 g / less than half an ounce) Peppercorns
25 g (less than half an ounce) Green Cardamom pods

In a small pan on medium heat, roast each spice individually (it hardly takes a minute) until you get a nice aroma. Make sure you stir it throughout so that it doesn’t burn. As soon as each spice is roasted, transfer it to a bowl to cool slightly. Once they are all roasted, grind into a fine powder by using a coffee grinder, or pestle & mortar. Store in an airtight container and use as needed.


Cheese scones

19 Mar

I’m moving flat soon.  And as a result I’m staying in a lot, with the intention of clutterbusting.  The other evening the most sensible thing to do seemed to be to clutter bust a kitchen cupboard by using ingredients to bake something, and then get my colleagues to eat it.

So, cheese scones were the chosen baked goods (I have a colleague who can’t eat sugar, so has missed out on many treats in recent months; and I owed him big time for a missed deadline).

Cheese scones are so easy to make.  In fact all scones are so easy to make.  I should make them more often. These scones were made with a chillie cheddar, so had added spiciness, which is always good.  They were delicious straight out of the oven spread with butter, or the next day heated for 30s in the microwave to re-heat and then spread with butter. Yum.

Spicy cheese scones

140g SR flour

140g wholemeal flour (or plain)

1tsp baking powder

50g butter, straight from the fridge, cut into wee pieces

85g strong cheddar, grated

1 egg

2TBsp natural yoghurt

4 TBsp milk

Heat oven to 190C (fan) or Gas 5.

  1. Mix the flour, baking powder and a pinch of salt in alarge mixing bowl.
  2. Cut in the butter, in wee chunks, and rub in with your fingertips till it resembles breadcrumbs. You could probably use a food processor, or one of those clever pastry maker things, the shape of a horse’s stirrup.
  3. Add any herbs or spices at this stage – sage might be nice; or cayenne, or dried chilli if you like it hot or nigella seeds are quite scrummy.
  4. Stir in about 1/2 of the cheese and then make a well in the centre.
  5. Whisk the remaining ingredients together and pour into the well.
  6. Use a knife to bring all the mixture together to make a soft, but not sticky, dough. Add more milk if the dough is too dry.
  7. Turn onto a floured surface, and either press or roll out to about 2cm thick. Do not overwork, or it will get very tough.
  8. Cut with a knife, or use a cutter. Re-roll the trimmings to use all the dough.
  9. Place on a non-stick baking sheet, and sprinkle each scone with more cheese.
  10. Bake for 10 – 12 minutes until golden
  11. Cool on a wire rack. Or eat immediately.  With butter

Don’t you remember? Scones are the grub that makes the butter go.  Or something.

In case you’re interested, I have another go-to cheese scone recipe. It’s an even quicker recipe with a really good hack for incorporating the butter. Check it out and see which appeals most – they are both super-tasty.

Scone dough

Fresh out of the oven

Perfectly risen cheese scone


Tattie scones

13 Mar


Tattie scones in the pan

So, as I mentioned, we were expecting G’s kids for supper on Friday evening.  On Friday they contated G to say that supper would be too late for their kids so they’d come for lunch instead on Saturday.  What is it with them that they think they can just dictate when they will come?  I suspect it’s all tied up with the fact he left them when they were relatively young; and they think they have rights over him, and that he owes them in some way. And from the other side, he does feel guilty and wants to develop a better relationship with them.  Ah well.  I prefer entertaining over lunch anyway, espeically when bairns are involved.


Anyway, I made a typical Wolffe-lunch with soup for starters, and then followed by a table groaning with tasty salady things: the beetroot and goats cheese tart, beetroot and blood orange salad, egg mayonnaise with capers, spicy prawn marie rose, green salad, teeny tomatoes.. and a cheese board with plumbrillo and quince jelly.  All deliciously tasty, although perhaps we needed another carbohydrate with the main dishes.

Anyway, as a result of the cancellation, we had a large pot of potatoes, peeled and ready to boil. I boiled them up yesterday and we had some of them mashed with some brown stew and champed neeps and carrots. The remainder were destined for tattie scones.

Tattie Scones

500g mashed potatoes

125g plain flour

2 TBsp olive oil

Method

  1. Sift the mashed potatoes, or put them through a ricer.  If you’re working with freshly mashed potatoes, you probably won’t need to do this.
  2. If the potatoes are leftovers, and cold, then chuck them in a microwave for about a minute to warm them up again – this will make them much easier to work with
  3. Add the flour and olive oil into the bowl and bring together – start with a spoon, but then work with your hands. It should create a slightly sticky soft and pliable dough.
  4. Take a chunk of the dough and roll it out to slightly less than 5mm thick, in a big circle. Cut the circle into quarters, and prick the quarters all over.
  5. Pop the 4 quarters into a dry non-stick fry pan over a medium heat and cook on either side till they have the distinctive brown blotches all over them. You’ll need a fish slice at this stage, or it will end in tears.
  6. Place on a  wire rack to cool.
  7. Repeat the rolling, cutting, pricking, cooking process with all the mixture.

This is a slightly time consuming recipe, once it gets to the rolling and cooking stage. Apart from that it is easiness itself.  And so satisfying to make your own tattie scones.

This made 4 (or was it 5?) rounds of tattie scones – plenty for tea for you and half a dozen guests.  If you have biscuits too.  I never did put up that lemon kisses recipe did I?


Slather butter all over and eat.


I’m half way through making a scumptious other thing now – with yeast.  I can’t say any more about it as it’s this months daring kitchen challenge, and I can’t reveal it till the end of the month.  It’s looking good so far though.

And this evening I’m planning on making my first Jamie Oliver 30 minute meal – a salmon dish. I’m omitting the pudding, so it surely has to be possible? We’ll see.

My first Daring Bakers Challenge

3 Mar

I’ve recently discovered more food-related blogs than is good for me.  I like to browse them, see what other people are cooking around the world and pick up inspiration.

And then I discovered the Daring Kitchen.  This is a blog with a difference – each month we are all challenged to make a particular recipe.  This month was my first Daring Bakers Challenge, and I’ve actually done it!  I’m so excited.

The February 2011 Daring Bakers’ challenge was hosted by Mallory from A Sofa in the Kitchen. She chose to challenge everyone to make Panna Cotta from a Giada De Laurentiis recipe and Nestle Florentine Cookies.

I had a practice run of the Panna Cotta last weekend at the valley, a delicious vanilla panna cotta, with a coffee gelee.  And then separately I practiced the florentines, here in Bruntsfield. They were lovely, but hadn’t spread properly and it felt the recipe should have had some bicarbonate of soda to make them work.  Never mind, my colleagues loved them.

So, the final version is a chocolate panna cotta, with orange gelee; accompanied by orange florentines. It all looks pretty tasty, and if you like bitter chocolate and orange together then you’ll love this.

I slightly adapted the recipes. And hope the next challenge is slightly less fattening.  I suspect I hope in vain.

Chocolate Panna Cotta

Recipe adapted from Bon Appetit

Ingredients:
1 cup (240 ml) whole milk
1 tablespoon (15 ml) (7 gm) (¼ oz) unflavored powdered gelatin
2 cups (480 ml) whipping cream (30+% butterfat)
½ cup (115 gm) (4 oz) sugar
¾ cup (145 gm)(5 oz) bittersweet or semisweet chocolate
½ teaspoon (2½ ml) vanilla extract

Directions:

  1. Pour milk into a small bowl, sprinkle gelatin over the top, set aside for 2-5 minutes.
  2. Place a medium saucepan over medium heat, stir in cream, sugar and vanilla. Bring to a low boil.
  3. Add chocolate and whisk until melted. Whisk the milk/gelatin mixture into chocolate cream mixture. Whisk until gelatin has dissolved.
  4. Transfer to ramekins, or nice glasses for serving.
  5. Cover and chill at least 8 hours, or overnight

Nestle Florentine Cookies

Recipe from the cookbook “Nestle Classic Recipes”
Ingredients:

2/3 cup (160 ml) (150 gm) (5.3 oz) unsalted butter

2 cups (480 ml) (160 gm) (5 2/3 oz) quick oats
1 cup (240 ml) (230 gm) (8 oz) granulated sugar
2/3 cup (160 ml) (95 gm) (3⅓ oz) plain (all purpose) flour
1/4 cup (60 ml) golden syrup
1/4 cup (60 ml) whole milk
1 tsp (5 ml) vanilla extract
pinch of salt
1½ cups (360 ml) (250 gm) (9 oz) dark or milk chocolate

Directions:

Preheat oven to moderately hot 375°F (190°C) (gas mark 5). Prepare your baking sheet with silpat or parchment paper.
1. Warm the butter, sugar and syrup in a medium saucepan.  Stir together to form a gloopy thick syrup, then remove from the heat.
2. To the melted butter mixture add oats, flour, milk, vanilla, and salt. I also added 1 tsp bicarb of soda.  And replaced the vanilla with the grated zest of two oranges.  Mix well. Drop a tablespoon full, three inches (75 mm) apart, onto your prepared baking sheet. Flatten slightly with the back of your tablespoon, or use a spatula. I didn’t bother flattening the mixture and they managed to spread themselves out nicely enough.
3. Bake in preheated oven for 5 minutes, until cookies are golden brown. Cool on the baking sheets.
4. While the cookies are cooling melt your chocolate until smooth either in the microwave (1 1/2 minutes), or stovetop (in a double boiler, or a bowl that fits atop a saucepan filled with a bit of water, being sure the water doesn’t touch the bottom of the bowl).
5. Peel the cookies from the silpat or parchment and place face down on a wire rack set over a sheet of wax/parchment paper (to keep counters clean).
6. Spread a tablespoon of chocolate on the bottom/flat side of your cookie, sandwiching another (flat end) cookie atop the chocolate.
This recipe will make about 2 1/2 – 3 dozen sandwiched Florentine cookies. You can also choose not to sandwich yours, in which case, drizzle the tops with chocolate (over your wax paper).

Millionaire’s Shortbread

24 Jan

This is surely one of Scotland’s greatest culinary triumphs? Hey, I think of it as Scottish, but perhaps it’s not?  Does anyone know? Also, I note that it is called Caramel Shortbread or Caramel Slice these days.  Do millionaire’s have such a bad press nowadays? Or is it some trades description ruling gone mad?

Anyway, the exquisite combination of smooth creamy chocolate, squishy sweet caramel and crisp shortbread is a true winner.  Traditionally it is served in decent sized slices, but I prefer to cut them into canapé style bite-size squares.  That way you can have one as a wee treat and it’s not toooooo calorific. OK, it is. It probably contains the total recommended calorie intake for a rugby team for a week, but surely that’s what treats are all about?

I wasn’t in my usual kitchen this last week, staying at my Mum and Dad’s, so I didn’t have access to my usual recipe books, or to an easy internet connection to look up recipes online.  I found a shortbread recipe, which I adapted, in a charity cookbook.  And I guessed with the caramel, and it seemed to work well.

Millionaire’s Shortbread

6oz butter

3oz caster sugar (I used vanilla sugar, out of the jar)

6oz plain flour

1oz custard powder

For the caramel

1 large tin of condensed milk

about 2oz butter

about 2 oz caster sugar (vanilla sugar again will give it a lovely subtle vanilla-y flavour)

a wee bit of milk if necessary

A very large block of Dairy Milk chocolate

So, I started the night before, making the caramel.

  1. Put the condensed milk, butter and sugar in a heavy based pan and warm gently.
  2. Stir constantly for a good ten minutes, or possibly more until it is a delicious golden toffee colour. You could test it at this stage, by dropping a wee bit on a cold saucer and seeing if it’s a squishy consistency when it cools. Once it seemed ready, I walked away and spent the rest of the evening watching Brideshead Revisited on DVD.
  3. Now for the shortbread – Beat the butter and sugar together until light and fluffy.  This will be oh so much easier if you start with soft butter, so if you have a cold kitchen you might want to leave it in a warm place for an hour or two, or soften it in the microwave if you have such a thing.  Being at home, I left mine beside the Rayburn overnight, and it was perfect.
  4. Now add the flour and custard powder.  You should probably add a wee teeny pinch of salt too, although I’m not sure it’s entirely necessary and in these days of trying to reduce our salt intake it probably is no longer recommended.
  5. Mix all together to form a dough.  Don’t be over vigorous about this, as I think it makes a better crisp bisuit if it’s not over-worked.
  6. Press into a buttered tin, and prick it all over with a fork.  Cook in a moderate oven (it was a Rayburn, I don’t have any more precise details than ‘moderate’) until it’s golden and ready. Yes, I said “until it’s ready”, probably at least 30 mins, possibly longer.
  7. While it was in the oven you could turn your attention back to the caramel.
  8. Here’s the cunning bit – as the caramel is now cool, you will be able to tell if it has the right consistency.  If it is too solid, just warm it gently (really gently) in the pan and add some milk to loosen it.  Stir it well once it’s warm. If it’s too runny then you’ll need to boil it up for longer (but this wasn’t an issue with me).
  9. At the same time you could be melting the chocolate in a bowl over a pan of water.
  10. When the shortbread is ready bring it out of the oven, and leave it in the tin. Spread the warm caramel over the shortbread.
  11. Leave it for a few wee minutes to cool slightly and then pour the melted chocolate over the caramel. Give the tin a wee shoogle to settle all the chocolate evenly and smoothly.
  12. Leave in a cool place, and carefully cut into bite-size chunks.

Sugar biscuits

1 Jan

These are a classic roll ’em and cut ’em out biscuit.  They are plain, in that they are vanilla flavoured, although the recipe suggests you could add some finely chopped nuts or coconut to the recipe.  I’ve never tried this, and not sure it would be worth it.  Sometimes you are just in the mood for an ordinary biscuit.

Sugar biscuits

175g / 7oz SR flour

pinch of salt

25g / 1oz cornflour

100g / 4oz butter

100g / 4oz caster sugar

1 egg (or it says you can use 2 egg yolks, which I guess would work if you were making meringues, or a mousse)

1/4 tsp vanilla essence

a little milk

More caster sugar, or glace icing for dredging once they are cooked

Grease 2 or 3 baking sheets. Oven 200ºC / 400ºF / Gas Mark 6.

  1. Sift the flour, salt and cornflour into a bowl.  I don’t think you need to do this any more.  This is an old book – I must have bought it in 1979 – and in those days the flour needed to be sifted.  The milling process has since improved and there is less need to sift flour for baking).
  2. Add the butter in wee chunks (straight from the fridge, it works best if cold) and rub in with your fingers until the mixture resembles breadcrumbs.  Try to add air into the mixture at this stage, by lifting your hands up from the mixture to rub, and letting it drizzle back down through your fingers.
  3. Beat together the egg and the vanilla essence and add to the mixture.
  4. Mix together and slightly knead to form a fairly soft dough.  Add a little milk if necessary.
  5. Wrap in cling film or  foil and leave to cool in the fridge for 30 minutes.
  6. Turn the dough out onto a lightly floured surface and roll out to about 5mm / 1/4″ thick.  Use whatever cookie cutters you have to cut shapes (preferably about 5cm / 2″ diameter) and place on the baking sheets.
  7. Bake in the pre-heated moderately hot oven for 8 – 10 mins or until lightly golden brown.
  8. Remove to a wire rack and either dredge with caster sugar while still warm, or wait until they cool and ice with glace icing.

This should make 30 – 40 biscuits.

This recipe is from one of my oldest and most loved and used recipe books: Cakes and Cake Decorating by Rosemary Wadey.  I bought it when I was in my early teens, and spent many a happy weekend and evening trying out new recipes.  I ticked each recipe off as I tried it at one point, but sadly left no notes, or other comment, such as a date.

I fell in love with the Grantham Gingers, a surprisingly hollow wee dome shaped biscuit, light and crisp, and delicately gingery.  And then there were the Danish Pastries – a triumph! And after my grandfather died, I made virtually every teabread in the book for his wake.   Perhaps it was then that I first discovered the  therapeutic power of getting into the kitchen and baking.