Tag Archives: recipe

Sweet chilli dipping sauce

3 Jul

I love chillies.  I love their heat.  And I love thai sweet chilli dipping sauce.

And then I found a recipe to make sweet chilli dipping sauce.  Thanks Thane Prince, from your Jellies, James and Chutneys book.  Lots of lovely things in there, but this is the one I kept coming back to, and thinking I had to make it.

Edited to say the title of the book would of course be Jellies, Jams and Chutneys.  Not James.  

So, last weekend, or was it the one before, I bought my chillies (my ones in the greenhouse aren’t ready yet) and made my first batch.

It’s another great quick recipe, and one that I think I will come back to again and again, although next time I’ll remember to put on a pair of latex gloves before chopping up 60z of hot chillies.

Sweet chilli dipping sauce

2 cups rice vinegar

15oz unrefined caster sugar

6oz red chillies, stemmed and finely chopped with the pith and the seeds

1 TBsp maldon salt

  1. Put the vinegar and the sugar in a large deep saucepan and slowly bring to the boil, stirring until the sugar has dissolved.
  2. Increase the heat, and boil rapidly for 5-8 minutes until the mixture becomes syrupy.
  3. Add the chiles and salt and cook for another 3-4 minutes. Watch carefully as the mixture can bubble up when the chiles are in there.
  4. Pour into hot sterilised jars, cover with vinegar proof seals and label.
The version I made is extremely hot and is perhaps nicest when added to other things like cream cheese or mayonnaise to make a dip.  Or a stir fry to pep it up a bit.
I keep it in the fridge, but it would probably be fine in a cupboard. It evidently keeps for 6 months.  Not in my kitchen it won’t, maybe 6 weeks.

When life gives you lemons…

3 Jul

… make lemonade.

Take a bag of unwaxed lemons.  Or if you’re lucky enough to have a proper shop nearby, pick 6 gorgeous unwaxed lemons from a box and put them in your wicker basket, or a brown paper bag, and pay for them.

Anyway, peel those lemons.  Use a vegetable peeler, but once you’ve peeled off a strip of peel, go back over it with a sharp knife to remove all the white pith, to prevent that marmaladey taste.

I love lemons. I hate marmalade.

Put the lemon zest in a big bowl.  Add about 4 – 5oz sugar.  Just ordinary white granulated sugar is best, although usually I’m a fan of any other type of sugar.  Then juice all the lemons into the bowl too.

Add about 2.5 pints of boiling water from the kettle – really, it’s not an exact science, so don’t worry about measuring precisely.

Now, give it a quick stir and then leave it be for 24 hours.

Give it a stir, and taste to see if you think it needs more sugar.

Then strain it and bottle it, into sterilised bottles. Keep chilled.  Alternatively you could freeze it in labelled bags, like soup, ready to bring out on a hot summer’s day.  And you do know the best way to freeze soup is to pour it into a bag, then place the bag in a tupperware box of your choice.  Once it is frozen, remove the bag from the box and you can stack your soup easily.

Use diluted with soda water, or ordinary tap water and lots of ice.  Looks great in a jug with slices of lemon, and add sprigs of mint or basil if you like.  Personally I find that lemon and mint flavour a little too much like mouthwash.


Parmesan and courgette herby muffins

2 Jul

I had to see the doctor yesterday morning.  At 10.30am.  But Id had to get up at 8am to phone the doctor, well to press the redial button many many many times before getting through to a receptionist who quite bluntly told me there were ‘no appointments today’.

I was ready for this.  My friend Jane had informed me that the way to see a doctor when faced with this sort of obstacle is to say, calmly, “It’s really important that I see a doctor today.”

Anyway, to cut a long story short, I eventually got an appointment for 10.30am.  Which gave me 2 hours to finish getting ready, bring my washing in from the line, have a quick tidy up and clean the bathroom, and make muffins.  Because of course that’s what everyone does when faced with some unexpected extra time at home.

Isn’t it?

I found the basic recipe here http://www.bbc.co.uk/food/recipes/gruyere_and_courgette_61507 and set to adapting it:

Parmesan and courgette herby muffins

8oz plain flour

1tsp baking powder

1 decent sized courgette, coarsely grated

3-4 oz parmesan, finely grated

200ml milk, and more if necessary

1 egg, beaten

75ml olive oil

a handful of chopped fresh herbs (marjoram, chives and parsley)

Line a muffin pan with muffin cases.  I ended up using 24 fairy cake cases in a regular sized muffin tin, to make nice small muffins.

  1. Mix together flour and baking powder
  2. Add courgette and cheese and mix
  3. In a separate bowl, mix the oil, milk and egg together. Add the herbs
  4. Pour the wet ingredients into the dry, and mix quickly together. Don’t over-mix, just bring everything together so it has no lumps of flour. The mixture needs to be quite soft and wet, but not runny
  5. Spoon a large soup spoonful of mixture into each muffin case
  6. Bake for 20 minutes (or until golden) in a medium hot oven (Gas Mark 5)

The muffins were cooled for a wee while on a cooling rack, and then bundled up in a clean tea towel, tied with a piece of string and taken to work to share with my colleagues. The verdict seemed positive!

Summer chicken supper

2 Jul

I love those days when you have an abundance of flavours to play with.  They are usually summer days, with herbs a plenty in the garden.

Today I knew I had a chicken breast for supper. And some savoy cabbage. And we already had potatoes but we had a wee potato surprise mid-afternoon.  One of the pear trees had got blown over in the storms earlier this year, and in its place a potato plant had grown! No doubt the tatties would have grown anyway, but at least this way we could harvest without damaging a precious pear tree.

And my new quince tree had been delivered this week, and it needed to be planted in the old pear tree space.  So today we lifted the rogue potato, and harvested half a dozen gorgeous new potatoes.  And the quince is happy!

So, boiled new potatoes were a definite for supper.  And shredded savoy cabbage, quickly boiled so it retains its fabulous colour and all its cabbagey goodness.

I decided to stuff the chicken breast, with some herby mushroomy numminess.

Mushroom stuffed chicken breast

Half a medium onion, finely chopped

4 mushrooms, chopped

a garlic clove, chopped finely

a large bunch of marjoram, chopped

One large skinless chicken breast

About 4 slices of parma ham, depending on the size of the chicken breast

Add a swirl of olive oil to a small pan, add the onion and heat gently.  Once the onions start to soften add the mushrooms and the garlic and cook gently.  Add the herbs.

While the mushrooms are cooking, ‘open out’ the chicken breast, but pulling across the mini fillet and making the whole breast as wide as it can go.  If it is thick enough, cut gently into the thickest part of the breast to help make it even wider.

Now place the chicken breast on a large piece of clingfilm, fold the clingfilm over it, so the chicken is enclosed.  And start bashing it out further using the heel of your hand.  You’re aiming to get the breast thinner, and fairly uniform in thickness.  And also big enough that you can encase the mushroom mixture in it.

Once you’re done, spoon the mushroom mixture in a ridge towards the edge of  the chicken breast.  And find a way to wrap the chicken round the mushroom – don’t worry if it’s not perfect, as you’re going to seal it by wrapping the whole thing in bits of parma ham.

So, that’s what you’re going to do next.  Wrap the stuffed chicken breast with pieces of parma ham.  It’s lovely if they all come out in nice neat slices and you can lay them overlapping on a board and then roll them round the chicken.  But if they come out in half slices, just do your best, by overlapping one piece then another till the whole chicken breast is encased in parma ham.

Lightly oil a baking tray, and then place the chicken breast on the tray and pop it in a medium hot oven for about 40 minutes or so.  Until it’s done.

Serve in fat slices – a whole chicken breast will be enough for two people – with new potatoes and savoy cabbage. Scrumptious.

No pictures – we ate it too quickly.


Elderflowers

27 Jun

I love elderflowers.

I love their mop headed look.

I love their sweet, heady scent.

And I love the gentle flavour, which can be captured so easily in a bottle.  A bottle of elderflower cordial or elderflower fizz is a perfect reminder of midsummer. Elderflower vinegar makes a delicious salad dressing.  And gooseberry and elderflower sorbet is a perfect ending to a dinner party.  Or a delicious amuse bouche.

More on the other recipes later.  This last weekend was all about the elderflower vinegar (if only because I had very little time, as I was working most of the weekend).

Elderflower vinegar

First go pick your elderflowers – try to pick them on a sunny morning, but certainly not in the rain.  You’ll need about 5 elderflower heads for every 300ml of white wine vinegar.  So, pick as many as you need, but no more – you want the elders to produce elderberries later in the year for other treats.

So, this is the easiest recipe in the world.  Pour the vinegar into a heavy bottomed pan.  Add the elderflowers (after you’ve picked them over to make sure there are no bugs or nasties).

Warm the vinegar.  Don’t let it actually boil, but get it steamyhot.  Use a wooden spoon to press the flowers down into the vinegar from time to time as it’ heating up.

Leave the vinegar and flowers in the pan till it’s all cooled down.

Strain through muslin. And bottle (the easiest is to put it back in the vinegar bottles it came out of).  Make pretty labels if you’re giving it away.

This is wonderful made into a dressing with olive oil, honey and mustard.  And garlic, black pepper, herbs, lemon juice and whatever else you fancy (or have in the cupboard).

I used the lovely Aspall’s organic white wine, but it would also be lovely made with cider vinegar.

Real men eat quiche (when I make it)

19 Jun

So. Yesterday morning I decided quiche and salad would make the perfect lunch.  I’d intended to have boiled new potatoes too, but completely forgot them at the last minute.  Ah well.

The quiche was going to be one of those fridge leftover scooper uppers, taking in full fat milk; some rashers of bacon, a red onion, frozen broad beans, and a chunk of Coolea cheese left over from G’s birthday.  Oh, and lots and lots of eggs.  And some parsley picked from the doorstep.

Spring quiche

Shortcrust pastry

8oz plain flour

2oz butter, cold from the fridge

2oz lard (cookeen), also cold from the fridge

Some grated parmesan

Salt and pepper, and some harissa style spice mix

  1. Sift the flour into a large bowl
  2. Chop the butter and lard in chunks into the flour
  3. Using your fingertips, rub everything together, lifting it high over the bowl as you go to incorporate air into the mix
  4. When it resembles breadcrumbs (ish) add the seasoning and flavourings if you want them – here I used some leftover parmesan in the fridge and some spicy herb mix
  5. Using a knife mix in enough cold water to form a stiff dough
  6. Squash down a bit (so it’s easier to roll out later) and wrap in clingfilm and leave in the fridge for at least 30 mins.
Quiche filling
3 rashers bacon
1 red onion
knob of butter
a bowl of frozen broad beans
a few spears of asparagus
5 eggs
about 1/2 cup milk
While the pastry is chilling in the fridge grease a tart tin (I used a loose bottomed non-stick tin which must be about 12″ across) and then start preparing the filling ingredients.
  1. Snip the bacon rashers with a pair of scissors into a frying pan (you could of course use a sharp knife, but I find it much easier to use scissors)
  2. Finely chop the red onion and add to the pan with the bacon
  3. Add a knob of butter and cook gently over a medium heat
  4. Meanwhile, if your broad beans need to be peeled again (the grey skin isn’t the nicest flavour, and it doesn’t look too good) then quickly boil them up in a pan with a little water. Boil for a couple of minutes, then rinse in cold water. They are easy to peel – nick the grey skin with your finger nails, then squeeze the bright green beans out of the grey pocket. Yum.  You’ll be surprised how small a bowl you need for the actual beans!
  5. Break the asparagus into roughly inch long sections.  Start by holding the asparagus at both ends and bend it till it breaks.  The end you are holding with the tip is the good stuff.  The other end may be too woody and can be thrown away.  To be honest, in this recipe I ended up using a bit of the woody end too.
  6. By now you can probably take the pastry out of the fridge, roll it out to about 3-4mm and line your well greased tart tin.   Or lots of wee ones if you are making individual quiches.
  7. Prick the base with a fork, leave the pastry draped over the edges while you bake it.  If you don’t the pastry is likely to shrink from the edges and it will be neater if you cook it like this and then cut off the draped edges later.
  8. Roughly cut a piece of greaseproof paper so it is slightly bigger than the tart. Lay this on top of the pastry and cover with baking beans, or ordinary dry beans or rice.
  9. Cook in a hot oven for about 10-15 mins, then remove the paper and the baking beans and cook for a further 3-4 minutes
  10. While it’s in the oven you can crack your eggs into a big bowl and start whisking them – I just use a hand whisk.  Add some milk, or cream if you have any. Or creme fraiche.  You could also add mascarpone cheese or other cream cheese if you have some.
  11. Season with freshly ground black pepper.
  12. Now, neaten the edges of the pastry case, and then start adding the filing.
  13. First, make a layer of bacon and onion.  Then add the broad beans and the then the asparagus.  Grate over some cheese and if you have any herbs add them – I’ve got a couple of pots of parsley by the front door and snipped off a good handful and sprinkled this over the other filling.
  14. You might want to put the tart tin onto another baking tray at this stage, just in case of leakage.
  15. Finally, pour in the eggy mixture and put straight into a hot oven.
  16. It’ll be ready in oh, about 20 – 30 minutes.
You may notice I haven’t got very precise weights, or timings.  I remember when I was still at school and my elder brother had phoned from his university digs to ask mum how long to boil tatties.  She had said ’till they are done’ which has always stuck me as the most sensible answer.
To be fair to my mother, we had an oil-fired rayburn which was on constantly and this forgiving way of cooking meant you never had to focus so carefully on timings.
This quiche is probably enough to feed 8 if you have various other salads and so on with it, if you only have a green salad, then it might only be enough for 6.  Of course, we shared it between two of us, but over several meals.
I think it tastes best still warm rather than hot hot from the oven, or cold from the fridge.

Triple chocolate ginger brownies

6 Jun

This recipe is a bit of an amalgam of several other recipes.  I had decided it was a chocolate brownie weekend.  That was after it had already been a garlic bread, asparagus & parma ham pizza, carrot soup and granary bread weekend.  More on the savoury stuff later, this is all about the chocolate.

So, the amalgam.  I looked at a few recipe books, and the recipe in Leon is the only one which stood out.  It was very particular about the order in which things were added, and also that the melted chocolate and butter should be allowed to cool slightly before mixing with other ingredients, to prevent it seizing up – this makes perfect sense to me now that it’s been mentioned.  They also whipped together the eggs and sugar to make a frothy loveliness before combining with flour/chocolate/butter/whatever else (I seem to recall a lot of orangey stuff, but I’m not a great fan of orange and chocolate).

So, I had some technique to think about from Leon.  And I had an old favourite recipe written out in my old cloth-covered Liberty recipe book.  I wrote it out years ago, and didn’t note where the original recipe came from, I suspect a Good Food magazine.

And on the opposite page from my old tried and tested brownie recipe I have scribbled in the ingredients for Triple Chocolate Brownies.  I made these for the first time when I was looking after my nephews about 2 years ago, and the recipe was either in a book (possibly Delia’s latest?) or ripped out and pinned up on the wall next to the rayburn.  Anyway, I made it, loved it and kept the recipe.

So, I wanted ginger chunks, and found an opened bag of crystallised ginger, you know the stuff all covered in granulated sugar that looks like a cross between a mis-shapen sugar lump and a pineapple chunk.  And I wanted deep chocolatey-ness.  And not too much squelch, more lightness than you might normally associate with a brownie.  And I didn’t want too much sweetness – my original recipe has LOTS of sugar and I felt sure I could lose some of the sugary sweetness without losing any of the nomminess.  I think I succeeded.  But you decide.

Triple chocolate ginger brownies

Grease a 20cm square tin and line with greaseproof paper.  Oven: Gas Mark 4 ish.

150g butter

200g dark chocolate

175g light muscovado sugar

3 eggs

75g plain flour (or use wholewheat if you have it in the cupboard, for a pretendie health improvement, with no associated loss of loveliness)

75g white chocolate

75g milk chocolate

75g crystallised ginger – use ginger in syrup if you can’t find the crystallised stuff, but I think the crystallised is less likely to sink.

  1. Melt butter and dark chocolate over a double boiler.  Use a microwave if you have to, but I prefer being able to heat it gently over water.
  2. You can take it off the heat before it is all melted, especially if you chopped it into smallish chunks before you started.  The residual heat will melt the remaining lumps.
  3. Leave to cool for a wee while, while you get all your other ingredients prepped.
  4. In another bowl, beat the eggs and the sugar together (Using electric beaters) until light in colour and creamy.  It won’t fluff up like egg whites, but it will hold quite a good heavy frothiness.
  5. Chop the remaining chocolate and the ginger into chunks about the half the size of your pinky finger nail.
  6. Now, keep the electric beaters running and gradually add about half of the not-quite-so-hot-now chocolate-butter mixture.  Then mix in the flour, and finally the remaining chocolate-butter mixture. You should have a batter thick enough to fall off a spoon, but not so thin that it just runs off in a liquid stream.
  7. Now stir in the chocolate and ginger chunklets.
  8. Pour into the prepared tin and bake for around 45 minutes.
  9. Cut into teeny squares – I can generally get 16 -20 squares out of the tin.  It’s extremely rich and you only need a wee square to get that chocolatey hit.
For further gingeriness, you could replace some of the sugar with some syrup from a jar of ginger, and even add some ground ginger.  Or grate some fresh ginger and add the juice to the mixture.  Although I possibly only suggest that last one as I recently acquired my mother’s old ginger grater (it is a glass implement, slightly reminiscent of a lemon squeezer gone wrong).
And you could adapt this in many other ways such as:
  • omit all ginger and replace with vanilla paste
  • or omit all ginger and replace with the zest of an orange; use a terry’s chocolate orange cut into chunklets for further orangey-ness
  • add chopped nuts – I think pecans would work well
  • or hazelnuts, and you could replace some of the flour with ground hazelnuts – perhaps a couple of TBsps
  • omit the ginger and instead of adding ordinary chocolate, break in some mint chocolate matchsticks, or whatever they are called – you know the chocolate sticks that look a bit like a chocolate twiglet
  • wee nubbins of marzipan instead of ginger – and replace a couple of TBsps of flour with ground almonds, and add a few drops of almond essence

Tablet

5 Jun

My brother wants a tablet recipe to bag up and sell at a fair… and so I have been tasked with giving him the best tablet recipe I know.

Hmmmmm… I used to have a good plain tablet recipe, but not sure where it is right now, possibly in the flat in Edinburgh.  But never mind, I have an array of Sue Lawrence cook books here, and she is the most reliable recipe writer I know.

So, I give you White chocolate and cardamom tablet

Sue Lawrence instructs you to follow these instructions to the letter.  I would urge you to do the same.  There’s nothing worse than attempting to make tablet and ending up with soft goo.  Or something that sets too hard and too quick and is impossible to cut into cute wee squares.  OK, there are actually some things worse, but you know what I mean.

125g / 4 1/2 oz unsalted butter

1kg / 2 1/4 lb golden granulated sugar

300ml / 1/2 pint full fat milk

a pinch of salt

200ml / 7fl oz condensed milk (this is half a regular can)

100g/ 3 1/2 oz  quality white chocolate, grated

7-8 cardamom pods, snipped open and seeds crushed (about 1tsp)

Butter a 23cm x 33cm Swiss-roll tin

  1. Place the butter in a large heavy based saucepan and melt slowly.
  2. Add the sugar, milk and salt and stir until the sugar is dissolved, still over a low-ish heat. Don’t be tempted to turn the heat too high, you don’t want it to boil before the sugar is dissolved.
  3. Bring to the boil and simmer over a fairly high heat for 8-10 minutes, stirring often, getting into all the corners.
  4. Add the condensed milk, chocolate and cardamom and simmer for 8-10 minutes over a medium high heat, stirring constantly.  Turn off your phone, or if you don’t , ignore it if it rings.
  5. After 8 minutes, remove the pan from the heat and test the contents for readiness: it should be at the ‘soft ball’ stage which means that when you drop a little of the mixture into a cup of very cold water, it will form a soft ball that you can pick up between your fingers.  If you are using a sugar thermometer, it should register 115C / 240F.
  6. Remove the mixture from the heat at once and beat with an electric beater (set at medium speed) for 4-5 minutes (or by hand for 10 minutes) until the mixture begins to stiffen a little and become ever so slightly grainy.
  7. Immediately pour it into the prepared tin and leave to cool.
  8. Mark the tablet into wee squares when it is almost cold.
  9. When it is completely cold, remove it from the tin and store in an airtight container or wrap in waxed paper.

I haven’t made this for years, but I love it.  The white chocolate and cardamom isn’t overwhelming but adds a slight sophistication to this ultimate Scottish home made treat.  Whoever saw a bag of tablet for sale that wasn’t ‘Homemade’?


Daring kitchen challenge

29 Mar

Do you know the Daring Kitchen website?  If you like a challenge, and you love cooking, then this is the site for you.  Go google it. (i’d put in a linky thing, but I seem to have lost the ability to do that).

Anyway, the March 2011 Daring Baker’s Challenge was hosted by Ria of Ria’s Collection and Jamie of Life’s a Feast. Ria and Jamie challenged The Daring Bakers to bake a yeasted Meringue Coffee Cake.

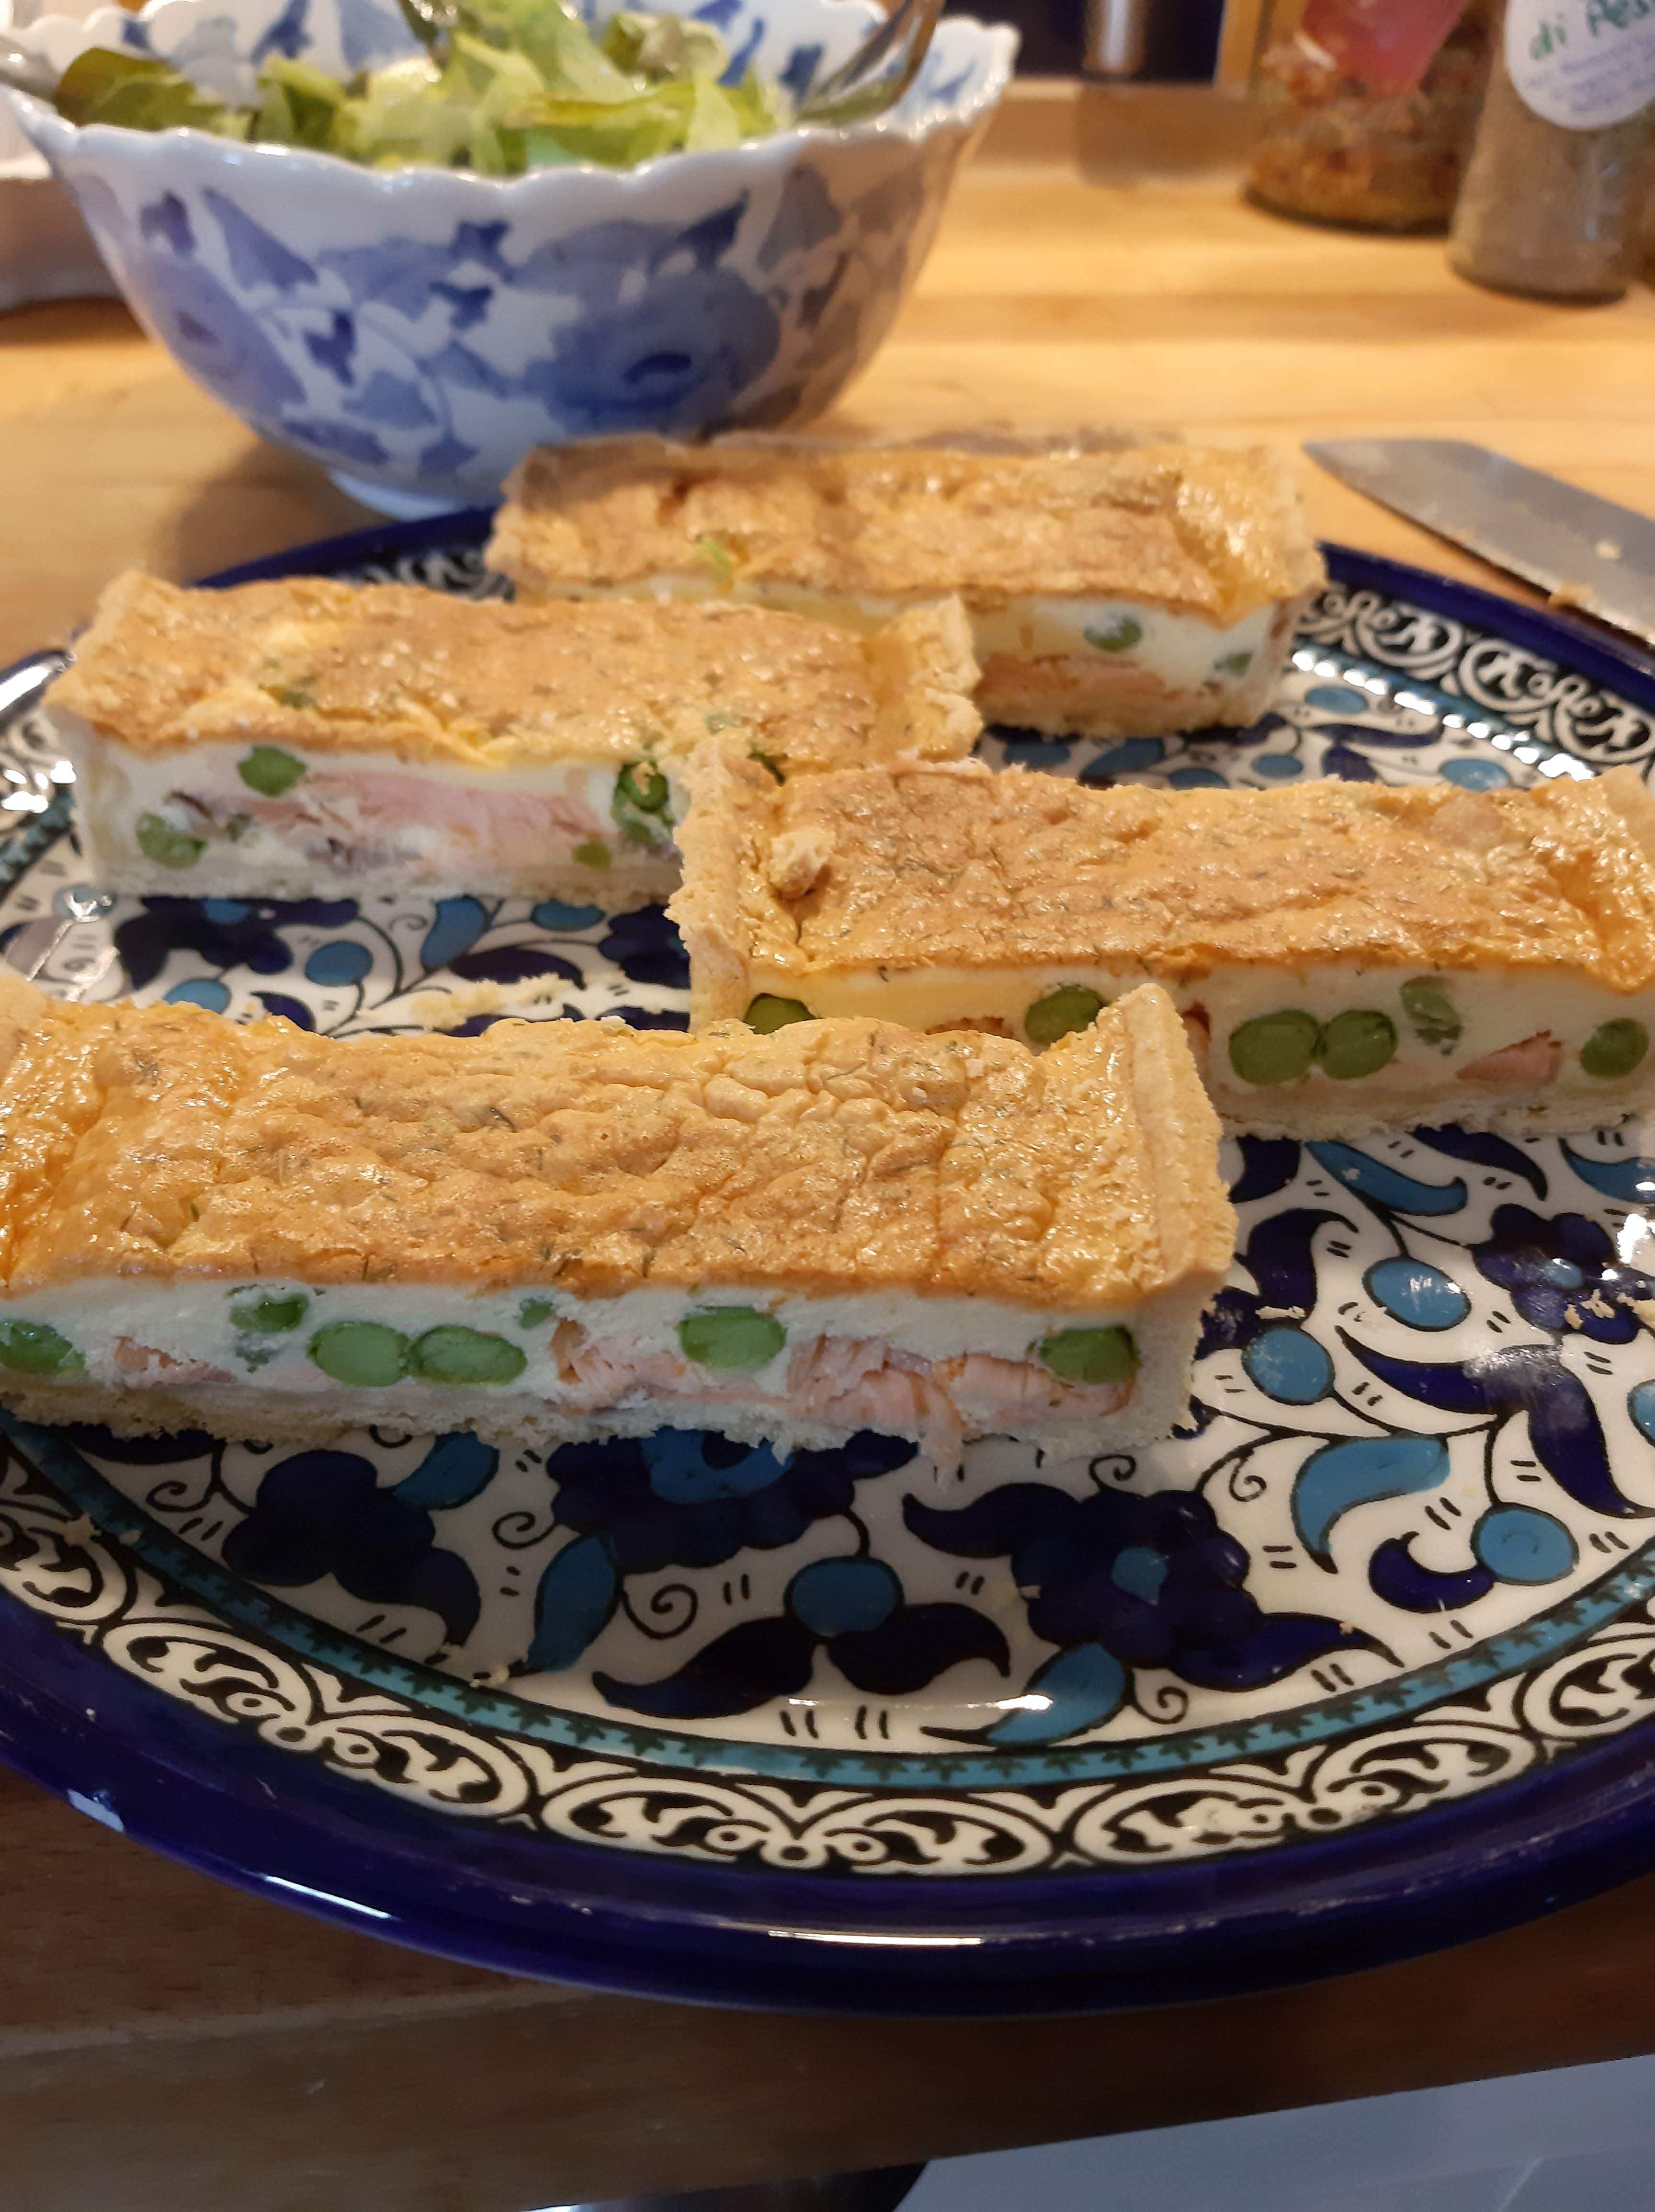
It was awesome.  It was something I would NEVER have attempted, but in reality it was actually pretty straightforward to make. So, thank you Daring Kitchen for encouraging me to make this scrumptious cakey thing.

My instruction was to make two cakes, but I just made the one.  This is the recipe for making the one cake, approx 10” in diameter.   I have included the alternative filling ingredients at the end… and I think I might try this alternative version in the next couple of weeks.  After I’ve moved flat.


The Daring Baker's finished product


FILLED MERINGUE COFFEE CAKE

Not sure why it’s called a coffee cake, there is no coffee in it. Perhaps it’s a technical term for a cake made with yeast?  Any thoughts anyone?

Ingredients

For the yeast cake dough:

2 cups (300 g / 12oz) flour
1/8 cup (25 g / 1 oz.) sugar
½ teaspoon salt
½  sachet (1 tsp) active dried yeast
3/8 cup (90 ml / 3 fl. oz.) whole milk
1/8 cup (30 ml / 1 fl. oz. water (doesn’t matter what temperature)
¼ cup (65 g / 2.5oz.) unsalted butter at room temperature
1 large egg at room temperature

For the meringue:

2 egg whites at room temperature
pinch of salt
½ teaspoon vanilla
¼ cup (55 g / 2 oz.) sugar

For the filling:

½ cup (55 g / 2 oz.) chopped pecans or walnuts
1 Tbsp (15 g / ½ oz.) granulated sugar
¼ teaspoon ground cinnamon
½ cup (85 g / 3 oz.) dark chocolate, chopped roughly

Egg wash: 1 beaten egg
Cocoa powder (optional) and confectioner’s sugar (powdered/icing sugar) for dusting cakes

Directions:

Prepare the dough:

  • In a large mixing bowl, combine 1 1/3 cups of the flour with the sugar, salt and yeast.
  • In a saucepan, combine the milk, water and butter and heat over medium heat until warm and the butter is just melted. Ria’s version: add the 10 saffron threads to the warmed liquid and allow to steep off of the heat for 10 minutes. This will give the mixture a distinct aroma and flavor and a yellowish-orange hue.
  • With an electric mixer on low speed, gradually add the warm liquid to the flour/yeast mixture, beating until well blended. Increase mixer speed to medium and beat 2 minutes. Add the eggs and ½ cup flour and beat for 2 more minutes.
  • Using a wooden spoon, stir in enough of the remaining flour to make a dough that holds together. Turn out onto a floured surface (use any of the remaining flour) and knead the dough for 8 to 10 minutes until the dough is soft, smooth, sexy and elastic, keeping the work surface floured, adding extra flour as needed.
  • Place the dough in a lightly oiled bowl. Cover the bowl with plastic wrap and a kitchen towel and let rise in a warm place until double in bulk (probably about 45 – 60 minutes). The rising time will depend on the type of yeast used and the temperature of the room


Beating the dough

The lovely smooth, silky dough, before it's started rising

Prepare your filling:

  • In a small bowl, combine the cinnamon and sugar for the filling. Chop your chocolate and nuts, and keep them in separate bowls.

Once the dough has doubled, make the meringue:

  • Beat the egg whites with the salt, first on low speed for 30 seconds, then increase to high and continue beating until foamy and opaque.
  • Add the vanilla then start adding the sugar, a tablespoon at a time as you beat, until very stiff, glossy peaks form.

Assemble the Coffee Cakes:

  • Line a baking sheet with parchment paper.
  • Punch down the dough and divide in half. On a lightly floured surface, roll out the dough into a 20 x 10-inch (about 51 x 25 ½ cm) rectangle.
  • Spread the meringue evenly over the rectangle up to about 1/2-inch (3/4 cm) from the edges.
  • Sprinkle the filling evenly over the meringue.
  • Now, roll up the dough jellyroll style, from the long side. Pinch the seam closed to seal.
  • Very carefully transfer the filled log to one of the lined cookie sheets, seam side down. Bring the ends of the log around and seal the ends together, forming a ring, tucking one end into the other and pinching to seal.
  • Using kitchen scissors or a sharp knife (although scissors are easier), make cuts along the outside edge at 1-inch (2 ½ cm) intervals. Make them as shallow or as deep as desired but don’t be afraid to cut deep into the ring.
  • Cover the cakes with plastic wrap and allow them to rise again for 45 to 60 minutes.
  • Preheat the oven to 350°F (180°C).
  • Brush the top of the cake with the egg wash.
  • Bake in the preheated oven for 25 to 30 minutes until risen and golden brown. The dough should sound hollow when tapped.
  • Remove from the oven and slide the parchment paper off the baking sheet onto the table. Very gently loosen the cake from the paper with a large spatula and carefully slide the cake onto a cooling rack.
  • Allow to cool.
  • Just before serving, dust the top of the cake with icing sugar and cocoa powder if using chocolate in the filling. I forgot to do this and it didn’t seem to mar the enjoyment of the cake.

These cakes are best eaten fresh, the same day or the next day, although I quite liked it as it got slightly chewier after a day or two.  But ok, best on the day it’s made.  Warm with ice cream.  Oh yes!

For the other version you will need 10 strands saffron for the dough.  (Saffron might be hard to find and it’s expensive, so you can substitute with ½ – 1 teaspoon of ground cardamom or ground nutmeg.)

Ria’s version filling:
1 cup (130 g / 5 oz.) chopped cashew nuts
2 Tablespoons (30 g / 1 oz.) granulated sugar
½ teaspoon garam masala (You can make it at home – recipe below – or buy from any Asian/Indian grocery store)
1 cup (170g / 6 oz.) semisweet chocolate chips ( I used Ghirardelli)


**Garam (means “hot”) masala (means “mixture”) is a blend of ground spices and is used in most Indian savory dishes. It is used in limited quantities while cooking vegetables, meats & eggs. There is no “one” recipe for it as every household has a recipe of their own. Below, I am going to share the recipe which I follow.

4 or 5 sticks (25 g) Cinnamon Sticks (break a stick and open the scroll)
3 ½ tablespoons (25 g / less than an ounce) Cloves, whole
100 g. (3.5 oz.) Fennel seeds
4 tablespoons (25 g / less than an ounce) Cumin seeds
1 ½ tablespoons (10 g / less than half an ounce) Peppercorns
25 g (less than half an ounce) Green Cardamom pods

In a small pan on medium heat, roast each spice individually (it hardly takes a minute) until you get a nice aroma. Make sure you stir it throughout so that it doesn’t burn. As soon as each spice is roasted, transfer it to a bowl to cool slightly. Once they are all roasted, grind into a fine powder by using a coffee grinder, or pestle & mortar. Store in an airtight container and use as needed.


Cheese scones

19 Mar

I’m moving flat soon.  And as a result I’m staying in a lot, with the intention of clutterbusting.  The other evening the most sensible thing to do seemed to be to clutter bust a kitchen cupboard by using ingredients to bake something, and then get my colleagues to eat it.

So, cheese scones were the chosen baked goods (I have a colleague who can’t eat sugar, so has missed out on many treats in recent months; and I owed him big time for a missed deadline).

Cheese scones are so easy to make.  In fact all scones are so easy to make.  I should make them more often. These scones were made with a chillie cheddar, so had added spiciness, which is always good.  They were delicious straight out of the oven spread with butter, or the next day heated for 30s in the microwave to re-heat and then spread with butter. Yum.

Spicy cheese scones

140g SR flour

140g wholemeal flour (or plain)

1tsp baking powder

50g butter, straight from the fridge, cut into wee pieces

85g strong cheddar, grated

1 egg

2TBsp natural yoghurt

4 TBsp milk

Heat oven to 190C (fan) or Gas 5.

  1. Mix the flour, baking powder and a pinch of salt in alarge mixing bowl.
  2. Cut in the butter, in wee chunks, and rub in with your fingertips till it resembles breadcrumbs. You could probably use a food processor, or one of those clever pastry maker things, the shape of a horse’s stirrup.
  3. Add any herbs or spices at this stage – sage might be nice; or cayenne, or dried chilli if you like it hot or nigella seeds are quite scrummy.
  4. Stir in about 1/2 of the cheese and then make a well in the centre.
  5. Whisk the remaining ingredients together and pour into the well.
  6. Use a knife to bring all the mixture together to make a soft, but not sticky, dough. Add more milk if the dough is too dry.
  7. Turn onto a floured surface, and either press or roll out to about 2cm thick. Do not overwork, or it will get very tough.
  8. Cut with a knife, or use a cutter. Re-roll the trimmings to use all the dough.
  9. Place on a non-stick baking sheet, and sprinkle each scone with more cheese.
  10. Bake for 10 – 12 minutes until golden
  11. Cool on a wire rack. Or eat immediately.  With butter

Don’t you remember? Scones are the grub that makes the butter go.  Or something.

In case you’re interested, I have another go-to cheese scone recipe. It’s an even quicker recipe with a really good hack for incorporating the butter. Check it out and see which appeals most – they are both super-tasty.

Scone dough

Fresh out of the oven

Perfectly risen cheese scone